Showing posts with label Brass. Show all posts

Wednesday, May 3, 2017

Less Brass

Finished
While the brass shower door in the master bath has been something I wanted to replace for ages, I have held off because it was merely a cosmetic issue and not a need.

Lately however, the door has started to not work as it should and not be connected to the stall correctly. This has made the choice to replace it more of a need and less of a cosmetic issue.

This door is one of four things left in this house that are brass, and I am thrilled to be rid of it. The new door makes the shower look so updated even though the stall itself is original to the house. The lines and color really just update it so much and I am so pleased.

Unfortunately because of the unique shape of my shower stall, this wasn't something I could just order and replace myself, I needed to to have it done. I got an estimate last week and then the door was custom created and the install was today.

Before
I have to wait forty eight hours before I can use it so that the silicone has a chance to dry, so I pulled the necessities out so I could shower in the guest bath downstairs for the next two days.

Next week we start on the fixing of the front porch!

Tuesday, September 30, 2014

Brass Hardware Removal At The Bamboo Lagoon

One of the 6 old brass handles and latches
As you know, I have been on a mission....a never ending mission to get rid of all the brass accents in this house. Since we had to have to doors pulled off to do the floors, I decided this would be a good time to replace all the hinges and doorknob hardward on our 6 upper floor doors.

So we had thse ornate brass handles and latches on all 6 prehung doors. On top of that, none of them had locks, which some of the doors really needed.

I bought three regular brushed nickel door knobs, and three locking brushed nickel door knobs to cover the 6 upper floor doors.

Old brass hinges

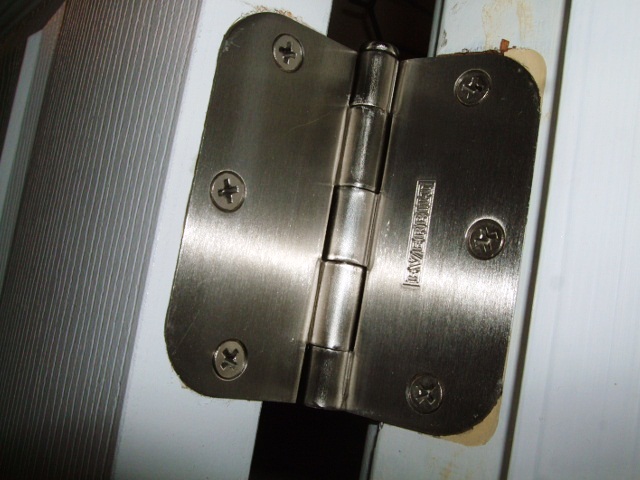
I bought a bulk pack of brushed nickel hinges that matched the size and shape of the brass ones we already had so we wouldn't have to do too much work on the doors themselves. I also got a few brushed nickel hinge placed door stops so I could get rid of the ugly brass ones that were screwed into the floor or baseboards.

New hinge after door has been put back on

I popped the hinges on the doors with a screw driver and put them back together once they were removed from the door so we could donate them to restore. I taped the screws into holes so they wouldn't get lost.

Once I got them off, I put the new hinges onto the door frame, and then popped them open with a screwdriver to separate them and hang the second half on the door we had already taken off for the floor job. I made sure when I was doing this, that I put the matching pairs so that there wouldn't be an issue with putting the doors back on the frame.

One of the new knobs

I replaced the door knobs and latches on each door, except for one that is still not reachable in the mess. Now we have locks on our bedroom, office and bathroom doors on the upper floor. I put the pins used to unlock them along the door frames so they would be easy to access if needed.

We have the new ceiling fan and the faucets for the next brass projects and then the only thing left will be the trim around the shower doors in the master bath...whoeee!

Saturday, July 26, 2014

Back Porch Light Replacement

So this house has 4 porch lights, and each one is different. Two of them were the brassy 80's style. We have wanted to replace them since we bought this house.

Last week, I finally got the replacements purchased. I managed to get the two on our back porch done in the morning on one of my days off, since it was shady on that side of the house. We have had very hot weather here for a couple of weeks now so any outdoor improvements have to be done in the shade or during the cooler times of day.

This was the one near our back slider

This was the one next to the back door
The actual change out wasn't that difficult. Both of these did not have electrical boxes for them, so that is something that probably needs to be dealt with at some point. I mostly just wanted to get them installed. Neither one is really exposed to weather directly so I am not too worried, but putting them into junction boxes is something that needs to be done eventually.

These are the two new back ones after installation. I was trying to find something with a simple Asian look to them...mostly, I end up looking at Mission and Craftsman style stuff to get the simple lines. The front ones will be a bit different because those need to be bigger fixtures and the ones they had to match these ones were gigantic so I went with a different style in a motion light.

New one next to back slider

New one next to back door
I think they look pretty cool and are definitely better than what we had up there. The old fixtures will go to the ReStore since they are still usable. Nice to see more brass leaving this house!

Saturday, March 23, 2013

Finished Bar Replacements

It has been a long time coming. I have finally gotten around to replacing the towel bar in the upstairs bathroom and the paper dispenser and towel bar in the downstairs bathroom.

The upstairs bathroom still needs the hole from the old towel bar patched but at least I have the new one installed.

The downstairs bathroom needs a little bit of patching behind the paper dispenser but I was able to get everything installed without having to move its location. Once I get the walls painted in both bathrooms, it will be so much better!!

Where the paper dispenser goes

Once the new brackets were installed (they are straight, my picture taking isn't)

All done, but small holes behind need to be patched still

Wednesday, January 23, 2013

Today, Just One Thing At The Bamboo Lagoon

Home improvement motivation lagged today at the Bamboo Lagoon, so I told myself to get just one thing done, and the one thing was to finally put in the box for the cable hookup in the master bedroom. I had already changed out this outlet and the cover for it but in order to connect the cover for the cable jack, I needed to put in a box. I knew that connecting a regular cover to the drywall would not be a permanent fix, it would eventually get loose and be sloppy.

I found these cool boxes at the DIY, with the help of a lovely employee, that are made just for this kind of application. You do not need to have a stud to tie into, and you don't have to make a huge hole in your wall and then patch it. You just cut a hole the same size as the box and then use the built in clamps to secure the box to the drywall itself.

So I grabbed my handy dandy drywall saw (which I purchased for another drywall project I have yet to do), and cut a smart little hole the same size as the blue box. I tried to line it up so that when both covers were on, it would look neat and tidy. Since this is an outside wall, there is insulation behind the hole but this is okay because it meant I didn't have to add any little insulation pieces to the cover once I was done with it.

I popped one of the preformed holes in the back of the box out and threaded the cable line into it. I then pushed the box into the hole and proceeded to screw it into place. I stripped the cable wire as instructed on the coax endings I needed to put on it. I also put the pieces of the cover adapter on the the blue box to help me connect the cover later.

I then added the threaded pieces that go on the cover to hold the coax in place once it is on the wall and connected the coax to the cover. I had to work a bit to push the coax back into the wall so I could screw in the cover plate. When the room gets painted in the near future, all these coverplates have to come off and I don't want it to be a mess or too difficult to accomplish. There isn't anything to hook up to this new jack but at least is looks better than it did and it is all set up just in case we do at some point have a device we want to hook to it.


Here is the final result...minus the new paint we'll someday have.

Wednesday, December 5, 2012

One Thing

Recently I was on the phone with my dad and I was telling him about how I wasn't making headway on some projects because the mixture of my perfectionist and procrastinist personality was keeping me from starting anything that I couldn't complete in one attempt.

He said, "you need to just do one thing a day"...if you get more done, great but as long as you do one thing, you are doing okay. So today, I really wanted to settle in for a couple of movies but I told myself that I couldn't until I did my one thing.

My one thing today was to replace this outlet with a GFCI outlet since it is located right next to the sink in the masterbath. The key was that it has to be done during the day since I figured that turning off the circuit breaker for the bathroom would take out the lights.

One thing I have found in the process of projects at the Bamboo Lagoon, is that nothing is easy. And as simple as this seemed, it wasn't as easy as it looked.

1. Found all tools needed including headlamp.
2. Flipped breaker marked Masterbedroom and bath.
3. Checked lights, all were out, but thankfully, I also tested the outlet just to be safe and I found that it was still hot.
4. Spent twenty minutes flipping other breakers and testing outlet trying to figure out which circuit it was on without having to flip a main.
5. Found it was the circuit marked Bath and Garage, and when I hit it, it killed the power in the upstairs office (which used to be a 1/2 guest bath) which meant no Internet.
6. Removed the screws to pull the socket out of the wall. It was an older socket so removing the wires was different than what I was used to.
7. Turned on circuit breaker so Internet would come back up.
8. Watched tutorial and figured it out.
9. Flipped circuit breaker again. Removed wires from back.
10. Connected GFCI outlet. Pushed outlet back into electrical box, and attached with the two screws.
11. Turned on the breaker and tested the outlet, tester said it was set up right.
12. Screwed on new faceplate, noticed that outlet was crooked.
13. Removed the faceplate and unscrewed the outlet to see if something was blocking it in the back.
14. Cleaned up back of electrical box.
15. Rescrewed in the outlet and put faceplate back on.

Looks a lot better don't you think? This room is going to get patched and repainted as soon as some other little projects get done so the wall will eventually look better.

Wednesday, November 28, 2012

Brass Removal At The Bamboo Lagoon

We are making headway in getting rid of the brass in the master bedroom/bath at the Bamboo Lagoon.

Nothing major just yet since getting rid of the plumbing and the shower stall door are down the road, but for now, all lightswitch and socket covers have been replaced as well as the toilet paper dispenser, hardware on the cabinets (even though the cabinets themselves will at least be refaced at some point in the future), and the towel racks....and it looks so much better, even without floors.


The towel rack took more work than anything but that is how things go. The sheetrock anchors that were used previously were not only the strongest I have ever seen, they were stripped and of course the new rack needed a different bracket than the one there so the brackets had to be removed. There was no way to get them out without just grabbing them with pliers and pulling them out, which means another sheetrock patch to be done and the rack had to be moved just a couple inches higher than it was. I'll post a pic when the patch is done since it looks pretty crappy right now.


It is coming together. Yeah!

Sunday, November 25, 2012

The Beginning Of The End

Gotcha...I am referring to the eventual end of brass in this house. It will take some time, and money we don't have handy right now but since I had a lightswitch plate to change out, I thought I would at least get rid of one thing. In the masterbath, everything, I mean EVERYTHING is brass and it is all going...but not yet.

Against my nature, I am having to just take my time and not try to do everything all at once. So changing this one thing was a step in the right direction for me. I have taken down some things that we can either live without or that we have replacements for from the other bathroom (since it is still in disrepair). I removed the toilet paper dispenser and a couple of towel racks...all three of these, I have extras from the other bathroom.

So this one, obviously is smaller than the one I took down, but the bathrooms are eventually going to get painted so it will get fixed eventually. And I would like at some point to change out some of the outlets themselves (those that need it, and if we do, we'll do white ones to match). That is the word of the day it seems...eventually.