Showing posts with label Fixit. Show all posts

Wednesday, May 3, 2017

Less Brass

Finished
While the brass shower door in the master bath has been something I wanted to replace for ages, I have held off because it was merely a cosmetic issue and not a need.

Lately however, the door has started to not work as it should and not be connected to the stall correctly. This has made the choice to replace it more of a need and less of a cosmetic issue.

This door is one of four things left in this house that are brass, and I am thrilled to be rid of it. The new door makes the shower look so updated even though the stall itself is original to the house. The lines and color really just update it so much and I am so pleased.

Unfortunately because of the unique shape of my shower stall, this wasn't something I could just order and replace myself, I needed to to have it done. I got an estimate last week and then the door was custom created and the install was today.

Before
I have to wait forty eight hours before I can use it so that the silicone has a chance to dry, so I pulled the necessities out so I could shower in the guest bath downstairs for the next two days.

Next week we start on the fixing of the front porch!

Thursday, October 1, 2015

Dishwasher Door Gasket

On the project list....I think the steak knives have have scrapping a spot of the gasket.

Thankfully there is no leakage yet, but this needs to be taken care of, and soon.

Just one more of those small little tasks that needs to be taken care of and take up room on the To Do list....grrr

Saturday, May 2, 2015

Moving And Organizing Project Room

This is still a work in  progress but at least we have made a dent and it can be used for guests when it needs to be as well.

We had to move quite a bit around as well and there still needs to be some purging done in order to get everything to fit like it should.


These two pics are what it looked like when we started. The cabinet below is an antique Chinese cabinet that I use for storing paper project supplies. There is a table set up at one end for my computer projects and then one along the window for creative projects. We put the fold out futon on the opposite wall for guests.


The supplies in the picture below are for the tile floors we are going to put in all the wet rooms in the house. They were in the project room but we moved them to the hallway so that the project room could be set up like it should. Hopefully this stuff shouldn't be in the hallway for too long.


Thursday, March 19, 2015

Fence Post Repair

Gap in fence with old post and a couple boards missing
So the fence that borders my neighbors in the back has started to sag in a couple of spots. My neighbor decided that he was willing and able to do the work if I was willing and able to buy the materials....having removed a post or two before, I knew immediately that I was getting the better end of the deal.

So unfastening the boards near the post and the cross boards to the post was the easy part....it was manhandling the 100+ pound of cement out of the deep hole in the ground that really got all of us working.

We ended up having to use a chain with a ratchet on it around a nearby tree to finally get the chuck out. My neighbor disposed of all the broken parts from the fence.

Once he had the old posts out, we mixed new cement and poured it into the hole with the new post in it. The cement sets pretty quickly but he came out several times to recheck level to make sure that the posts weren't shifting much.

The chuck of old cement with the broken post end in it


New post in place


New cement in place

Once the new posts set up overnight, the new brackets for the cross support boards and the new fence boards could be put on.

Cement cured and boards refastened


Second new post in


And set


Finished fence posts, nice straight fence

I think he did a great job and I still ended up with the better end of the deal. I have a post on the other side that needs fixing too but probably will have to hire someone as the slope of the yard near it might make it very hard to deal with.

Wednesday, March 18, 2015

Siding Fix At The Bamboo Lagoon

Broken boards on porch door
We have this little door on the area below our front porch and when accessing it earlier this spring, one of the pieces of siding split.

I took off the full piece below so I could get a piece of cedar siding at the lumber store that was the correct width.

Once I got back home, I decided to see if I could glue the old piece back together to just save on priming and painting time when we were in cold weather.

I think that it came out okay with some awesome wood glue that our flooring friend turned me on to and a few finishing nails.

Fixed door

Monday, October 13, 2014

Closet Fix (Finally)

Without the support on the end
This one has been on the list forever. This was broken when the water damage happened and we had to have that section of the closet replaced. Up until recently, we didn't need to hang anything in that closet so it wasn't a priority but since we have all of our stuff coming soon (like tomorrow), it was something that had to be done.

It really was quite easy...first mark where we needed the piece of wood to sit, and mark the studs in the wall. It was a piece of 1 x 4 that I used and cut to length on our chop saw.

Then predrilled two screw holes to mount the board. Once the board was mounted, then attached the plastic piece that holds the pole in place....really a pretty easy job and should have been taken care of ages ago.

Support in
Oh well, it is done now...and we probably won't end up hanging much in there since that closet is in our sports/weight room. Still needs painting but that will happen when the room gets painted.

Tuesday, September 30, 2014

Brass Hardware Removal At The Bamboo Lagoon

One of the 6 old brass handles and latches
As you know, I have been on a mission....a never ending mission to get rid of all the brass accents in this house. Since we had to have to doors pulled off to do the floors, I decided this would be a good time to replace all the hinges and doorknob hardward on our 6 upper floor doors.

So we had thse ornate brass handles and latches on all 6 prehung doors. On top of that, none of them had locks, which some of the doors really needed.

I bought three regular brushed nickel door knobs, and three locking brushed nickel door knobs to cover the 6 upper floor doors.

Old brass hinges

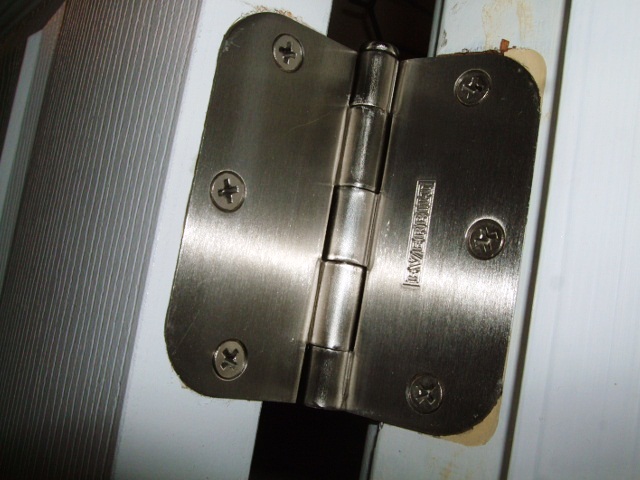
I bought a bulk pack of brushed nickel hinges that matched the size and shape of the brass ones we already had so we wouldn't have to do too much work on the doors themselves. I also got a few brushed nickel hinge placed door stops so I could get rid of the ugly brass ones that were screwed into the floor or baseboards.

New hinge after door has been put back on

I popped the hinges on the doors with a screw driver and put them back together once they were removed from the door so we could donate them to restore. I taped the screws into holes so they wouldn't get lost.

Once I got them off, I put the new hinges onto the door frame, and then popped them open with a screwdriver to separate them and hang the second half on the door we had already taken off for the floor job. I made sure when I was doing this, that I put the matching pairs so that there wouldn't be an issue with putting the doors back on the frame.

One of the new knobs

I replaced the door knobs and latches on each door, except for one that is still not reachable in the mess. Now we have locks on our bedroom, office and bathroom doors on the upper floor. I put the pins used to unlock them along the door frames so they would be easy to access if needed.

We have the new ceiling fan and the faucets for the next brass projects and then the only thing left will be the trim around the shower doors in the master bath...whoeee!

Thursday, September 18, 2014

Cabinets In The Laundry Room

We had some really yucky shelves in the laundry room and when figuring out what to do with the floor, I realized that it was the right time to get some stock cabinets installed. It made sense to enclose the laundry stuff and also to get them in before the washer and dryer were delivered.

Here is a shot of what the shelves looked like with all our stuff piled on them. Kind of a mess I am sure you will agree. If you read my post about the removal of the shelves and the work it created in the attic and roof, you will know why I put this one off for a while.

So first thing was to remove the gigantic screws that were holding the brackets in. This of course caused the issues with the dryer vent, but wasn't going to stop me.

Once the shelves were out, this is what the wall looked like.

Bald wall with washer faucets and GFCI

New cabinets on floor

After I leveled and installed ledger bar

With cousin help, cabinets mounted on wall

After I put the doors back on

And this is the final look, which is so much better than those open shelves. They are just basic stock shelves meant for a kitchen but they do the job and will hold up longer than the particle board options the "storage section" had as an alternative.

Right now, these cupboards are filled to the brim with odds and ends from not only the laundry room but all over the house while we get the bamboo floors installed, but that is another project for another post!

Monday, September 8, 2014

Attic Projects At The Bamboo Lagoon

There have been a couple of little projects involving the attic in this house on the list for some time. They weren't super intensive projects or anything but just something that needed to be done that hadn't been done.

So in the process of working on another bigger project yesterday, I kind of got forced to deal with one of them and since I was already dealing with one, it made sense to just knockout the other ones.

Dryer Vent Project

The dryer vent in this house goes up and out thru the attic. It has to be this way because of the way that the laundry room and our master bath nest up against each other. I found that the vent wasn't connected to the vent in the roof of the house so for a period of time, renters were venting into the attic space rather than out through the roof vent.

I had to put the vent piece up as high as it could go and originally, I figured I would get in the attic and just fix it there, but the space was way too tight so I ended up getting on the roof and fixing it from there.

Attic view where vent wasn't going through roof of house

Covered attic vent

Before screen and cleanout of lint
 I also cleaned the roof vent out of built up lint and put a new screen on it that can be removed and cleaned periodically since it is only clamped down.

With new bracket attached to keep it from falling into attic

With new screening and clamp attached

Electric Box Cover Project

The lighting in the laundry room used to be a standard overhead light, and at some point in time was changed over to be a florescent tube lighting fixture. When the electric box that previously fed the original light was covered, it was done so poorly. It didn't completely cover the hole in the drywall and it was crooked.

I had purchased a new paintable cover for it, but just hadn't gotten to it because I had to access the attic to push the electric box down flush with the drywall to attach it. Since I was already doing things in the attic, it seems logical to knock this small one out.

Hole and electric box in laundry room ceiling
The cover I bought for it
In place and it can be painted to match when ceiling is painted soon

Attic Access Cover Insulation

The piece of drywall that covers the access to the attic apparently had two bath towels stapled to it to provide insulation. Definitely not adequate. We had some left over insulation from the wall repair (and even though it isn't the same R factor you would use in an attic) and figured it would be a good option. I cut the piece to fit and then stapled it to the attic side of the drywall.


Drywall piece with no insulation

Extra piece of insulation

Finished project, better than it was for sure!

Miscellaneous Attic Checkups

As well as these three little projects, I also had plans to check the insulation in the attic to see if it was adequate (and it was), check the exhaust vents to see if they vented outside (and they do), and check if putting in a pulldown ladder and plywood for storage up there was feasible (and it really isn't). So all in all, even though I didn't get a lot of the other project done, at least that attic stuff is off the list!!

Saturday, June 7, 2014

Screens For The Bamboo Lagoon

Tools of the trade
The downstairs rooms have needed new screens for the last two years (and probably way before that) because some of our lame ass renters ruined them by using the windows as exits instead of using the doors like normal people.

I have been stalling on doing the screens because I knew the one for the weight room was going to be a pain in the ass. That window is older than the others in the house (probably original) and the track for the screen is totally different from any others I have seen. I think it might have had a wood screen for it originally.

Someday, I would like to replace a lot of the windows in this place, that this not in the budget any time soon, so we will make due for now.

Cutting the frame to size

I have had experience creating screens from scratch and just re-meshing a screen, but the created ones didn't seem to fit the way I wanted them to, which also made me hesitant.

Reading to add screen

I have to say on these ones, they came out great...even the one for the weight room is usable. The key to it all was taping down the frame once it was put together and then taping down two sides of the screen as it is being installed. Both screens came out nice and flat, and tight.

Weight room screen finished

Work room screen finished

To install the weight room one, I had to go outside to push it in a bit, but that was to be expected since that window is so weird. the fun part was that I was running the sprinkler system at the time, so I got a bit soaked...LOL

Friday, May 16, 2014

PVC Plumbing Repair

This project was not on the list at all but as I was turning on the water valves for feeding water to the sprinkler system in the front yard, I discovered a broken gate valve and so in order to use the sprinkler system, it had to be repaired.

Rusted and cracked

It seems that this supply line probably originally was just a spigot on the edge of the porch wall and when the sprinkler system was installed, they modified the set up to get water to the system. Since the gate is turned off in the winter to keep the pipes from freezing, air does get to the inside of the pipe and it is an old pipe so it just eventually rusted out.

Before cutting

I had to get a new gate valve, and then cut out the PVC portion, so I could remove the old gate valve and put in the new one, which then meant rebuilding the PVC portion. This was a better option than trying to cut through the galvanized iron pipes on the other side of the valved and then having to couple them.

First cut

Once I cut through the PVC in two spots with a hack saw to pull out the majority of it, I then unscrewed the old gate valve with a plumbers wrench. I took all the parts, including the new gate valve that I had previously purchased with me to the local hardware store to find out exactly what I would need to buy and configure.

Cut out portion and old gate valve

At the store, Jim helped me to figure out what pieces I needed and explained exactly how to do all the connecting, as I had never done any PVC "glueing" before. He actually threaded the pieces that had threads together for me before I left, and I took a picture of the set up so I would be sure to put it together correctly. He also cut several pieces of the 3/4 inch PVC I would be using in between to varying lengths, so I wouldn't have to cut them myself and I would have a few options for getting the new stuff lined up with the old stuff that still remained as part of the system.

Laid out at store

I also bought the primer and glue for the job since we didn't have any at home, with this being my first time ever doing this kind of plumbing.

New gate valve
Primer
Glue

When I got home, I cleaned up the threads of the pipe sticking out from the porch wall, and then reapplied three rounds of teflon tape before then screwing on and tightening the new gate valve.

New gate valve attached

Once I had it connected, I lined up all the other pieces where they would go in the line and made sure that the various connecting pieces of 3/4 inch pvc would fit where they needed to be. I cleaned up the ends of any rough edges of the cut pieces of PVC with a rasp file. I put on latex gloves as recommended by Jim to keep my fingers from turning purple or blue from the primer and glue. I then applied the primer to all the pieces I would be eventually applying the glue to, which included both sides of each junction.

Pieces with primer applied

Once I had all the pieces primed, I double checked my order of things and then started to apply the glue to each piece and its opposite junction piece and putting them together with one quarter turn. Once I had the entire thing glued back together, I cleaned up my mess. I decided to wait 24 hours before turning on the water to the system because we have a lot of pressure on our system and I wanted to give the entire thing time to set up.

All finished

We'll see how it works...I am sure as soon as the water is turned on, I will then have to deal with the issues the sprinkler system itself has, and that will be a new project to blog about.