Tuesday, September 30, 2014

Brass Hardware Removal At The Bamboo Lagoon

One of the 6 old brass handles and latches
As you know, I have been on a mission....a never ending mission to get rid of all the brass accents in this house. Since we had to have to doors pulled off to do the floors, I decided this would be a good time to replace all the hinges and doorknob hardward on our 6 upper floor doors.

So we had thse ornate brass handles and latches on all 6 prehung doors. On top of that, none of them had locks, which some of the doors really needed.

I bought three regular brushed nickel door knobs, and three locking brushed nickel door knobs to cover the 6 upper floor doors.

Old brass hinges

I bought a bulk pack of brushed nickel hinges that matched the size and shape of the brass ones we already had so we wouldn't have to do too much work on the doors themselves. I also got a few brushed nickel hinge placed door stops so I could get rid of the ugly brass ones that were screwed into the floor or baseboards.

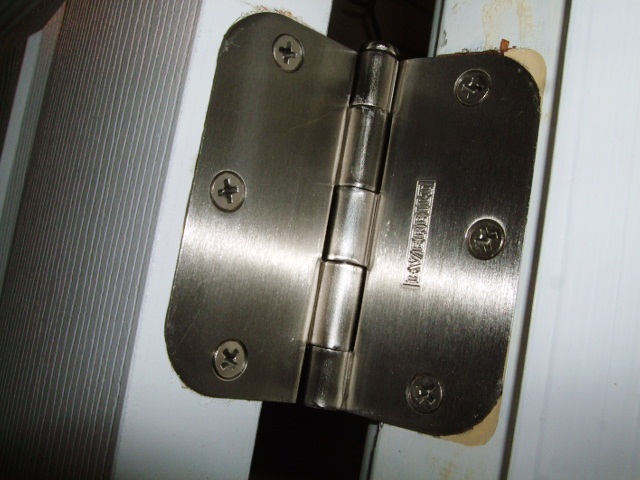
New hinge after door has been put back on

I popped the hinges on the doors with a screw driver and put them back together once they were removed from the door so we could donate them to restore. I taped the screws into holes so they wouldn't get lost.

Once I got them off, I put the new hinges onto the door frame, and then popped them open with a screwdriver to separate them and hang the second half on the door we had already taken off for the floor job. I made sure when I was doing this, that I put the matching pairs so that there wouldn't be an issue with putting the doors back on the frame.

One of the new knobs

I replaced the door knobs and latches on each door, except for one that is still not reachable in the mess. Now we have locks on our bedroom, office and bathroom doors on the upper floor. I put the pins used to unlock them along the door frames so they would be easy to access if needed.

We have the new ceiling fan and the faucets for the next brass projects and then the only thing left will be the trim around the shower doors in the master bath...whoeee!

Thursday, September 18, 2014

Cabinets In The Laundry Room

We had some really yucky shelves in the laundry room and when figuring out what to do with the floor, I realized that it was the right time to get some stock cabinets installed. It made sense to enclose the laundry stuff and also to get them in before the washer and dryer were delivered.

Here is a shot of what the shelves looked like with all our stuff piled on them. Kind of a mess I am sure you will agree. If you read my post about the removal of the shelves and the work it created in the attic and roof, you will know why I put this one off for a while.

So first thing was to remove the gigantic screws that were holding the brackets in. This of course caused the issues with the dryer vent, but wasn't going to stop me.

Once the shelves were out, this is what the wall looked like.

Bald wall with washer faucets and GFCI

New cabinets on floor

After I leveled and installed ledger bar

With cousin help, cabinets mounted on wall

After I put the doors back on

And this is the final look, which is so much better than those open shelves. They are just basic stock shelves meant for a kitchen but they do the job and will hold up longer than the particle board options the "storage section" had as an alternative.

Right now, these cupboards are filled to the brim with odds and ends from not only the laundry room but all over the house while we get the bamboo floors installed, but that is another project for another post!

Monday, September 8, 2014

Attic Projects At The Bamboo Lagoon

There have been a couple of little projects involving the attic in this house on the list for some time. They weren't super intensive projects or anything but just something that needed to be done that hadn't been done.

So in the process of working on another bigger project yesterday, I kind of got forced to deal with one of them and since I was already dealing with one, it made sense to just knockout the other ones.

Dryer Vent Project

The dryer vent in this house goes up and out thru the attic. It has to be this way because of the way that the laundry room and our master bath nest up against each other. I found that the vent wasn't connected to the vent in the roof of the house so for a period of time, renters were venting into the attic space rather than out through the roof vent.

I had to put the vent piece up as high as it could go and originally, I figured I would get in the attic and just fix it there, but the space was way too tight so I ended up getting on the roof and fixing it from there.

Attic view where vent wasn't going through roof of house

Covered attic vent

Before screen and cleanout of lint
 I also cleaned the roof vent out of built up lint and put a new screen on it that can be removed and cleaned periodically since it is only clamped down.

With new bracket attached to keep it from falling into attic

With new screening and clamp attached

Electric Box Cover Project

The lighting in the laundry room used to be a standard overhead light, and at some point in time was changed over to be a florescent tube lighting fixture. When the electric box that previously fed the original light was covered, it was done so poorly. It didn't completely cover the hole in the drywall and it was crooked.

I had purchased a new paintable cover for it, but just hadn't gotten to it because I had to access the attic to push the electric box down flush with the drywall to attach it. Since I was already doing things in the attic, it seems logical to knock this small one out.

Hole and electric box in laundry room ceiling
The cover I bought for it
In place and it can be painted to match when ceiling is painted soon

Attic Access Cover Insulation

The piece of drywall that covers the access to the attic apparently had two bath towels stapled to it to provide insulation. Definitely not adequate. We had some left over insulation from the wall repair (and even though it isn't the same R factor you would use in an attic) and figured it would be a good option. I cut the piece to fit and then stapled it to the attic side of the drywall.


Drywall piece with no insulation

Extra piece of insulation

Finished project, better than it was for sure!

Miscellaneous Attic Checkups

As well as these three little projects, I also had plans to check the insulation in the attic to see if it was adequate (and it was), check the exhaust vents to see if they vented outside (and they do), and check if putting in a pulldown ladder and plywood for storage up there was feasible (and it really isn't). So all in all, even though I didn't get a lot of the other project done, at least that attic stuff is off the list!!