Saturday, March 30, 2013

Pansies And Mulch

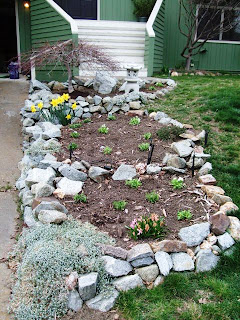
Spring has spung in this small spot
Knew that we were supposed to get some rain and thunder this evening, so on top of all the other stuff I got accomplished today, I was determined to get the pansies I bought two weeks ago into the ground and then get the three beds I have been working on mulched so they would not dry out so fast.

I didn't even start on the planting until after 3:30 in the afternoon because I was working on several other projects most of the day. I saved 3 of the pansies for one of the hanging baskets that no longer has anything alive in it. I want to get two trailing plants to put in each basket too. I found a bunch of little weeds trying to come up in my newly cleaned out beds...but I dealt with them.

So I put in 5 little bunches of pansies in groups of three. Then I used the two bags of awesome mulch that my mom gave me last fall. It perfectly filled all three beds including along the underneath of the Japanese Maple. I will be excited when the perinnials all start to grow and bloom.

Wednesday, March 27, 2013

Nothing Is Easy At The Bamboo Lagoon

This is the last electrical thing in the big project to be done on the interior of the house. I still have outdoor, garage and dryer electrical to do, but this one thing was supposed to mark the end of my switch, plate, and outlet project. I was putting it off a bit because I hate putting on ends to the coax, but the office desk has been pulled out for weeks and it was time to wrap it.

Guess what? It isn't wrapped up. As you can see in the picture, unlike all the other cable jacks in the entire house, this one was put in through the studs of the window framing...which makes putting in one of my little blue boxes to create a safe, and attractive way of cleaning up the cable jacks, completely impossible.

So, because I had already cut the cable (which supplies all the Internet for the whole house), I had to temporarily reattached it so I would have Internet, while I patch this hole and end up just putting a white plate cover on screwed into the drywall and studs rather than using a blue box. It will look fine to anyone that doesn't know, but it will always bug me just a bit that I wasn't able to blue box this one like the others.

The patch will take a day or so to dry completely so for now, the desk is still pulled out, and this little project is not check marked off my list. I could just kick the cable guy for doing this...I already dislike him for taking a chunk out of my newly painted siding when he put the line in and then didn't replace it correctly leaving a weird looking hole on the outside of the house as well.

Monday, March 25, 2013

Pool Outlet At The Bamboo Lagoon

It has finally been nice enough that I could finish off this task. I needed to be able to get under the deck and pull some wire. So it needed to be dry enough but not so warm that spiders or other creepy crawlies would be an issue.

I climbed under the deck for the slack, and while I was on that side of the fence, I also pruned the barberry that I thought was dead but is actually coming back (yeah!). I cleaned the pool, reset the timers and took out the lightbulb from the pump house since it is warm enough it doesn't need to be in there anymore.

I started to disassemble this outlet in the fall (in fact it was one of my first electrical projects at the bamboo lagoon along with fixing the pool light) but wasn't able to finish it before the weather turned. Today, I finished it, and tested it with my lagoon lights...now I can utilize this outlet to get some work done in the deepest parts of the backyard.

Old loose socket
With plate removed
Pulled out, rusted
Corroded wires (this is where I stopped last fall)
In order to put this new outlet in, I had to splice the 12 gauge solid ground wires together and then piggy back them to the outlet. I had to clean the corroded wires up so that I could use them without having to cut them off (since I was a little short on wire to work with). Then I had to shove with all my might the six 12 gauge wires back into the box and then screw it into place. They did not want to go in.

New outlet installed
New cover installed
At the end of it all, I turned on the power and the outlet works, and is grounded properly. I didn't test to make sure the circuit worked to the pool light switch but I have to assume it does as well.

Saturday, March 23, 2013

Finished Bar Replacements

It has been a long time coming. I have finally gotten around to replacing the towel bar in the upstairs bathroom and the paper dispenser and towel bar in the downstairs bathroom.

The upstairs bathroom still needs the hole from the old towel bar patched but at least I have the new one installed.

The downstairs bathroom needs a little bit of patching behind the paper dispenser but I was able to get everything installed without having to move its location. Once I get the walls painted in both bathrooms, it will be so much better!!

Where the paper dispenser goes

Once the new brackets were installed (they are straight, my picture taking isn't)

All done, but small holes behind need to be patched still

Thursday, March 21, 2013

Second Rod Replaced

After replacing the rod over the back sliding glass door and knowing that it would work the way I wanted, I managed to get another one for the front slider. Then I found suspension rods for the temporary fix for the two side windows (until we can afford to put blinds in there that match the other blinds in the house).

In a fit of project completion, I pulled the old rod, patched the old holes, painted the wall under the old brackets and then installed the new brackets and the new rod over the sliding glass door. It looks a million times better than the high water situation we had going before...

Tuesday, March 19, 2013

New Bamboo At The Bamboo Lagoon

So excited about this new bed. Cleaned it out during the massive cleanout for the other beds. It was filled with a bunch of random neglected stuff and I am so thrilled to find a great purpose for it.

Bed from top (before)
It is a little triangle of a bed that borders our front porch and the driveway. It gets a lot of sun.

Bed from driveway (before)
I got these clumping bamboos from the same guy that I bought the other three from last season. He had a couple other plants I got today too but they don't have ready homes just yet.

Bed from top (after)
Anyhow, I had to dig to fairly big sized holes for these two guys. Used the shovel instead of the trowel just to make the work go quicker and to beat the rain which started to come down right as I got the second one planted.

Bed from driveway (after)
I think they look awesome, and will be very happy in this spot once I get some mulch on them.

Monday, March 18, 2013

Cleaning Beds And Planting Perennials

Bottom two beds (before)
I hit the nursery and the DIY for some flowering plants for the front three beds in our yard. We have a dwarf Japanese maple in the top of the three beds and I really didn't want to plant anything that would distract from that. I also wanted to have the beds be some what low maintenance.

So I started at the bottom and worked my way up, weeding for a few hours each day. It took quite a while to knock they all out partly because I can't just pull a weed, I have to dig it out so I can get rid of the roots and hopefully not have to weed it again the following week. In the midst of my marathon weeding project, I also cleaned out a bed for bamboo (see most recent post) and also mounted a small offensive against the dandylions hanging out in our front lawn (since it is too cold still to use weed and feed yet).

The two flats of plants

After shot, this top bed was filled with grass

All three beds after weeding
I discovered in the process of it some daffodils and some hyacinth coming up in those three beds as well as some sections of ground cover. On the downside there were whole sections of the top two beds that had full grown lawn in them, and it was growing between a lot of the granite rock border. I had to pull the rocks out and clean around and below them just to make sure the grass wouldn't be making its way back into the beds any time soon.

With layout of plants before planting
After planting, and Lamb's Ear is coming back

After planting but before mulching
Once I got them all cleaned out, I set to putting in the 18 perennials I got from the nursery (one flat). I still need to put those pansies in and then mulch all the beds, but at least I managed this much before our storm this week.

What we think is a geranium (before)

Geranium with daylillies and tulips coming up nearby (after)
I also tackled cleaning up this one plant in a bed bordering the front of the house. I didn't do a thorough job on the rest of the bed yet, but it is on the list as are several other beds in the front yard. And this isn't counting the backyard....LOL.

Monday, March 11, 2013

New Bed and Plants At The Bamboo Lagoon

Yesterday, I went over to my sister-in-law's house to bring her some empty pots, and to dig up some raspberry canes and some other odds and ends for our house. They are going to be moving soon and she is an avid gardener and wants everyone to enjoy the benefits of her talent.

Today, I created a little flower bed where there wasn't one so I could get most of her stuff into the ground. I haven't planted the raspberries yet, but hope to get them in the ground this week while we have nice weather if I can.

New bed area (before, minus the wagon wheel)
This little bed was originally just some weeds, grass, two big rocks, a sucker off a neighbor's tree and some determined irises (I had already taken out the wagon wheel). Today, I noticed a few sprouts of daffodils so I decided to clean out the weeds, transplant the grass, and plant most of the small stuff I got from her in there, along with a few transplants I dug up from volunteers in our yard.

Close up of the bed (after)
The irises and little tree back up near the rock, and the daffodils up front were already here. The daffodils on the left are transplants from our yard and the rest of the plants are from her yard. I am really looking forward to the mini irises...I will need to take a bunch of pictures so I can document what grows in this yard since this is the first spring here.


The bed area from a distance (after)
I got the rocks from one of our other beds that I had to clear out for some bamboo I hope to plant this week as well. I added a bit of top soil at the end and then watered everything really good since we aren't expected to see rain the rest of the week. I really hope the transplants survive...if they don't, at least I have a little bed that is cleaned up to start some new stuff in.

Saturday, March 9, 2013

Solar Panel Work At The Bamboo Lagoon

As you might know from previous posts, we have solar panels on our deck roof that heat the pool during the summer time. Last year when I first got here, we tried to turn them on, but one of the pipe junctions broke and water came shooting out of it. So I turned off the pump for the solar panel, and didn't use the panels for the season.

I met up with a technician from the solar panel company and purchased replacement parts for the pipe junctions, but never got around to fixing it before it became too cold to use the pool.

Deck roof and panels with pinestraw (before)
Deck roof and panels without pinestraw (after)
In the meantime, the two Ponderosas that we have in the backyard left a ton of needles on the back deck roof and solar panels. The back deck roof is corregated metal and figuring out a way to get on the roof, while not damaging it or the solar panels, prevented me from attacking this project until now.

I finally was able to have a nice day, where the needles weren't super wet, and got on a ladder to look at the structure up close to figure out my best options. Once I could see where the studs were, I was able to get up on the metal roof from a different spot, and while using a soft deck broom, was able to sweep most of the needles off the roof and solar panels.

Ponderosa before pruning
Ponderosa after pruning out lower branches
While up there, I pruned the Ponderosa hanging over the roof so that there is some clearance and maybe a little bit more light hitting the solar panels. I spray painted all the cuts to keep the tree from getting infected.

Lastly while I was up there, I put the new gasket and pipe junction in where the old one broke. I wasn't able to test the system just yet since we are still freezing at night, but I am hopefull that it will hold. I inspected the other lower junctions and they all looked okay. I have to get on the roof in a different spot to check the upper ones, but I will do that on another day but before we turn the system on for the season.

Broken junction
Fixed junction
The amount of pruned limbs and pine straw filled the yard bin up to capacity. Overall, it was a very productive afternoon.

Thursday, March 7, 2013

Wrapping Up Interior Electrical

The small office on the main floor was the last room in the house left on the electrical exchange project I have been working on. This room was originally a small half bath and at some point the previous owner converted it to a small office space. There are two outlets, one cable jack, one phone jack and a double switch in the room.

Switch (before)
Midway through replacement
Switch (after)
The switch runs an old exhaust fan that will eventually be changed to an overhead light, and one of the outlets. I wired nutted the one that runs the outlet together and put in a blank plate cover for it so the outlet would always be on. I just replaced the switch for the exhaust fan so that when I put in the overhead light, it will run that.

I replaced the two outlets, which were in terrible shape with new white ones and new plate covers.
One of the outlets (before)
In progress
All done
I removed the phone jacks in the other bedrooms when I did those rooms, but decided that this one would be one that I rewired and replaced just so did just that in case we ever needed to use a regular phone jack again. Obviously I still need to patch from the old jack and repaint but that will be done when this room gets prepped.

Old phone jack while being replaced
Will look better once patching and painting is done
The cable jack was another one that needed a blue electrical box put in so that it could be anchored and set up correctly. Didn't take a bunch of pics of it since I have already documented that process.

Friday, March 1, 2013

Hunter Douglas At The Bamboo Lagoon

Bay Window in Bedroom
So the Bamboo Lagoon has Everwoodx blinds in 5 windows on the main floor and then Duette honeycomb blinds in the two bedrooms downstairs. The blind in the smaller of the downstairs bedrooms was broken, so it couldn't be pulled up, but other than dirt, was in perfect condition. I figured that it would have to be replaced because I had no idea that pullup blinds could be re-corded. So I called the local Hunter Douglas retailer to see how much replacing the blind would cost. This was my first dive into the pricing of Hunter Douglas blinds (and I was shocked). The cost to replace it was going to be way more than I could afford to do, but the salesperson mentioned that lots of blinds are repairable and that they also could clean it for me. I decided to give it a go.

This blind is 46 inches across. I removed it, and banded it together and took it in. They looked at it, and realized that it might have a warranty that would cover the repair and the cleaning would cost me 13 dollars. I left the blind with them along with the hopes that the warranty would still be valid....and it turns out, it was. So rather than paying almost 200 dollars to replace a blind in one room, I got back a clean, fixed blind for 13 bucks...yeah!

Once I saw how well the cleaning worked, I took down the longer blind in the second room and gave that to them to have it cleaned. I should note that these particular blinds (not the ones on the main floor) were purchased and installed in 1992...so to have blinds that are still functioning, in great shape and still under warranty 20+ years later explains the initial cost of these blinds. Way to go Hunter Douglas!